
My Fast Chicken Liver Pate Recipe
Pate is one of my favourite treats, fortunately it is also ridiculously cheap and easy to make.
This is my own recipe for pate, it has been cobbled together from trial and error, and a love of good pate. The recipe is very forgiving and allows for a lot of substitution and variance. While it is very easy to make, I recommend a good stick blender, or food processor and maybe a bit of patience as it can take a lot of processing to get a smooth pate.
Finding good quality fresh and well-cleaned chicken livers can sometimes be a challenge, but most good butchers will have them. Our local butcher sells them frozen by the half kilo tub for $5 which is a bit expensive for chicken livers but they are usually better quality than I can find in a supermarket. Occasionally I find good ones at the supermarket, but not that often…
Chicken livers should be a pinkish – purple colour ideally with little or no white connective tissue on them to make it easier to prepare them. They should not have any hint of yellowing, dispose of them if they are discoloured or do not smell fresh.
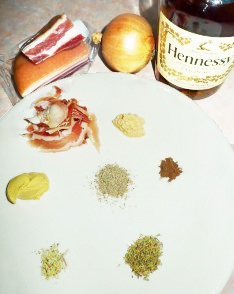 Ingredients
500g Chicken liver
1 small onion very finely diced or substitute a few small brown shallots for added flavour.
120g of salted butter
A small amount of finely diced bacon (no rind) or very finely shaved pancetta (roughly equivalent to a heaped tablespoon when compressed, see photo)
2 tablespoons of Port, Cognac, Cointreau, Sherry, or even Champagne, vary amounts to taste
Approximately 1/3 of a cup of cream. UHT cream helps increase fridge life a little, fresh is fine.
1 teaspoon of minced garlic
1/4 teaspoon of ground allspice
1 teaspoon of thyme, fresh or dry is fine, use slightly less if dried)
1/2 teaspoon of sage, fresh is best, but dry works fine
1 heaped teaspoon of Dijon mustard
1/2 teaspoon of coarse cracked black pepper
1/8 teaspoon of salt more if needed
Additional butter for sealing the finished pate
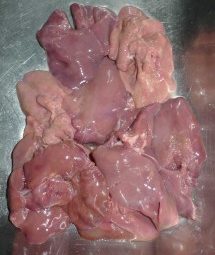
Connective tissue removed, rinsed and patted dry.
Method
Rinse the livers under cold running water, and remove any white or connective tissue. Dry them off on some paper towel.
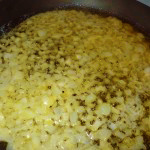 Heat butter in a large heavy-based frying pan on a medium heat. Add onions and begin to cook off the rawness.
Once the butter and onions are sizzling add liver and cook without turning to the point that they begin to get some colour on the underside (very light golden brown), about 5-7 minutes.
Turn the livers over and add the bacon, garlic, herbs, and spices. Cook for 5-7 minutes more, depending on the size of the livers. Turn the heat down and continue to cook on a gentle heat until the inside is just barely pinkish, the livers should be soft and should come apart easily to check how cooked they are if pressed with tongs. Add a few tablespoons of cream heat just enough to warm the cream through. Set the pan aside, allow to cool a little, it should still be warm but not too hot.
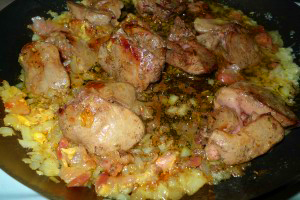
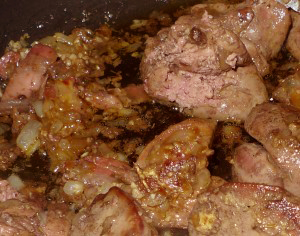
Perfectly cooked chicken liver, only just pink in the middle and breaks apart easily with light pressure from tongs.
To a food processor add a couple of tablespoons of the pan juices and hot butter. Add the liver and onion mix to the food processor and begin to coarsely blend, stop the processor regularly to scrape down the sides (and to prevent the motor getting too hot and burning out), if the mix is too dry add another tablespoon or so of cream. I’ve since found a stick blender works much better than the food processor attachment and gave a much smoother finish in half the time.
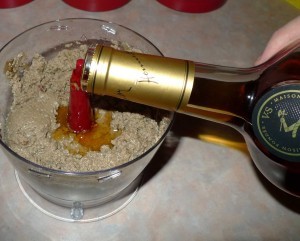
At this point add two tablespoons of port or cognac and blend through. continue alternating between blending and scraping down the sides of the processor/bowl, adding tiny amounts of cream to keep the mix blending smoothly.
Once the mixture is nearly smooth, taste a little of it and add the salt if needed. The salt improves the flavour and balances the flavour of the liver. Add pepper and slightly more alcohol if needed. Add extra alcohol sparingly as it will overpower all the other flavours. Process until very smooth, the pate should not have a grainy texture, and the herbs and pepper should be small enough so as not to impart any noticeable texture.
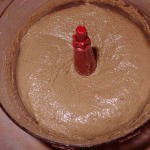 Pate should be silky smooth and velvety, never grainy or lumpy the only way to achieve this is with patient processing or by forcing the mix through an ultra-fine sieve; I don’t recommend starting with a sieve, it will take you forever, a basic stick blender works well, and in most cases it will not be necessary to sieve the mix.
*Wait for the pate to be cool completely before eating it, hot pate does not taste especially great, you should taste it while it is hot to get the seasoning (saltiness) and the alcohol content right in the final product.
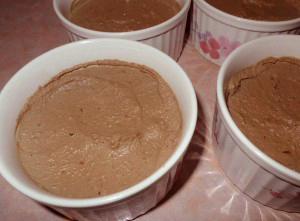 Spoon the pate into ramekins, smooth off the surface with the back of a spoon. If the pate is not going to be eaten that week cover with melted clarified butter to seal the pate.

Place in the fridge until the butter cap hardens then cover with cling film, this way the pate will last in the fridge for up to two weeks, the alcohol and other fats preserve the cream, if the cream was cooked the fridge life is extended.
Pate lasts in the freezer for a few months.
To serve remove the butter cap and allow the pate to warm up to slightly below room temperature which will make it more spreadable.
Variations
Herbs and spices like bay leaves and chives and green peppercorns can be substituted or included to suit your taste. Bacon or smoked ham can be substituted for pancetta and different alcohols can also be substituted; brandy, sherry, dry muscat, port, red or white wine and champagnes work quite well. I like to fold a tablespoon of canned green peppercorns through the mix after it has been blended.
Chicken breast or thigh can replace up to half of the liver. The regular meat needs to be cooked longer than the liver and is harder to process to a smooth pate, but it provides a lighter flavour that works well with champagne or dry white wine, bacon and green peppercorns.
For a fancier variation set some savoury flavoured jelly or aspic in the bottom of a mould before filling it with pate. Set the pate and turn out of the mould onto a cheeseboard for more attractive and delicious way of serving.
Experiment and have fun!